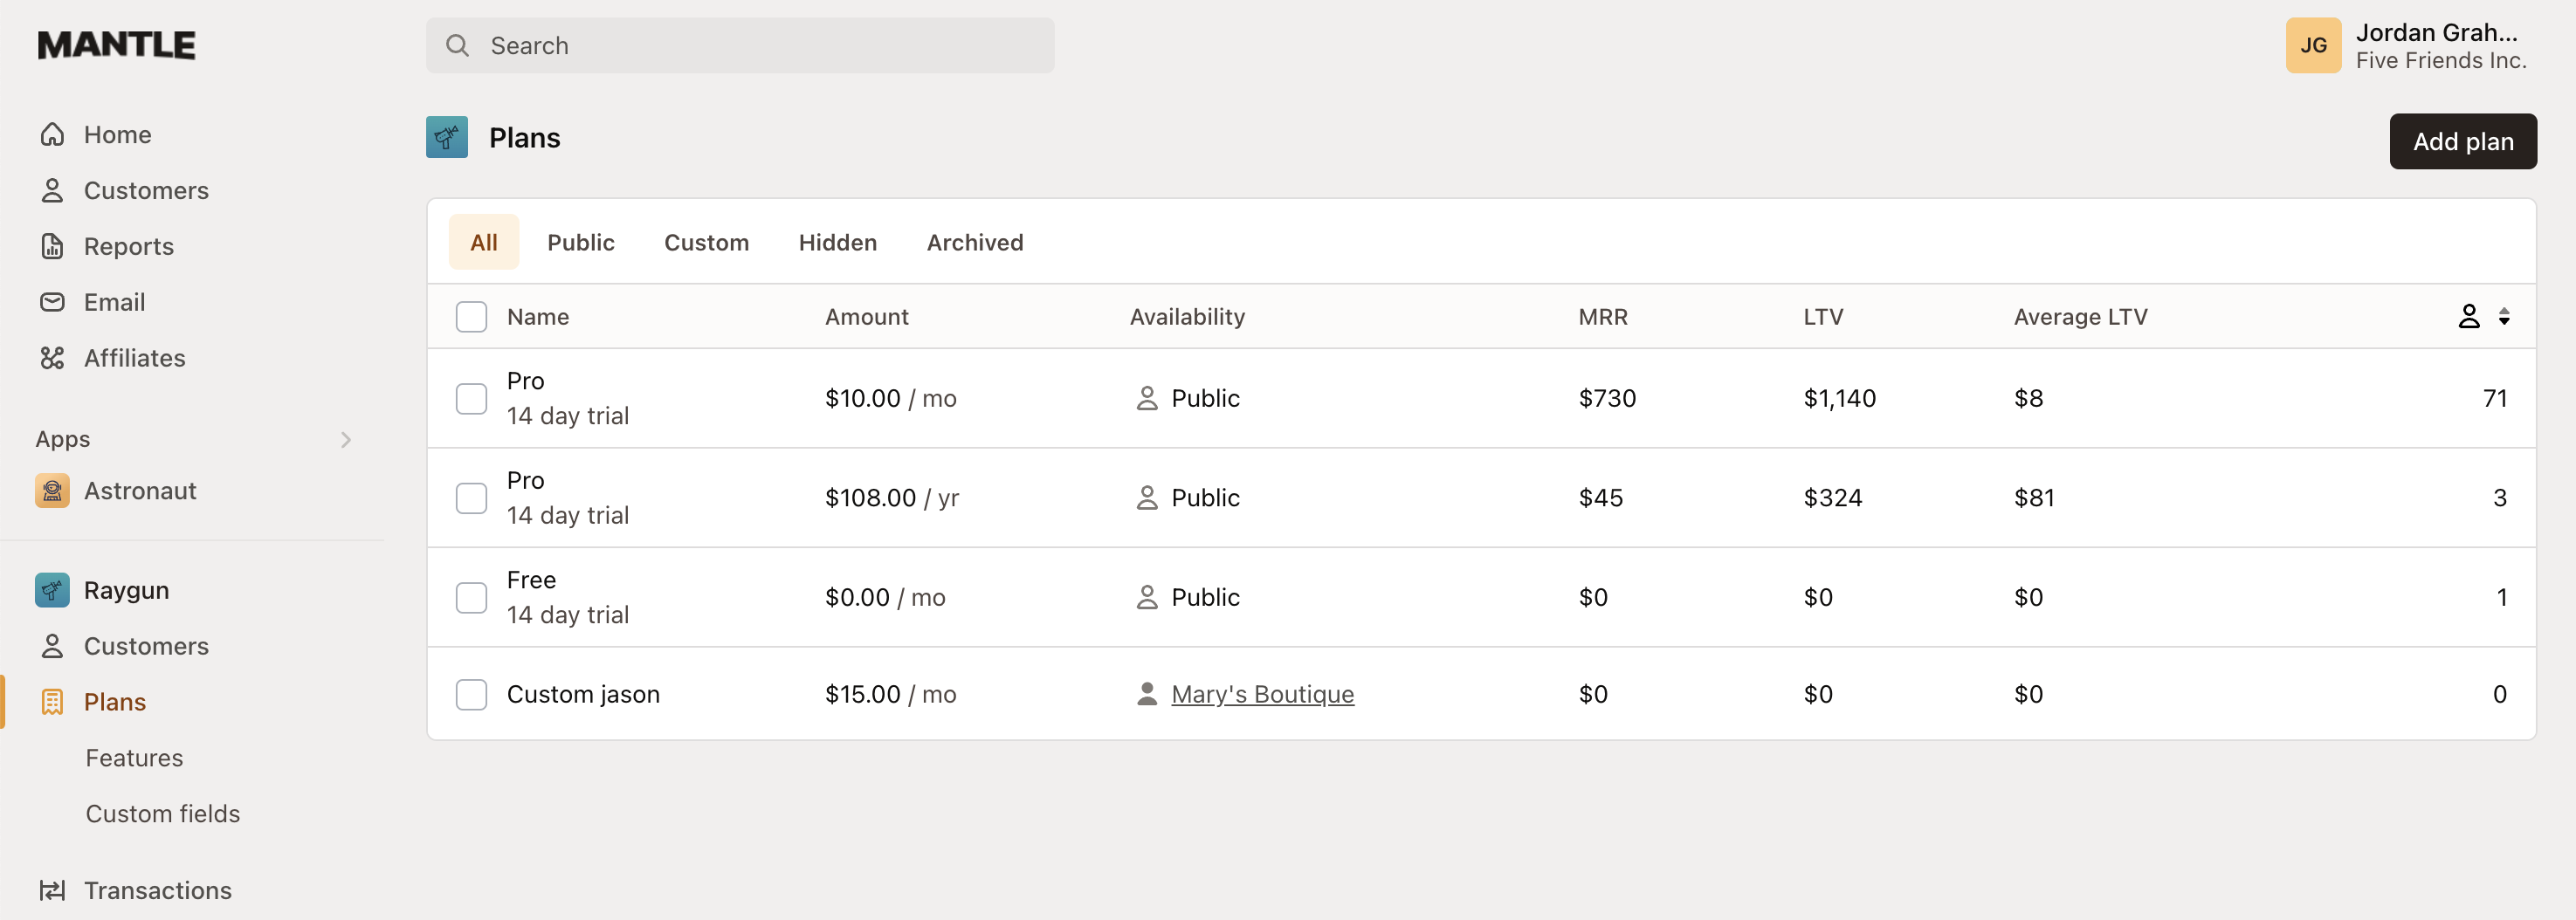
Plans
Mantle’s plan management tool enhances your app’s functionality, streamlining the creation and adjustment of subscription plans. This integration allows for real-time updates to plan offerings, ensuring a dynamic and responsive experience for your customers.
The tool’s customization capabilities enable precise control over pricing, trial durations, and billing cycles, all through Mantle’s intuitive interface.
This provides the flexibility to associate unique app features with distinct plans, tailoring your service to match diverse customer needs.
Managing & creating plans
Within the Plans view, you’ll discover an overview of your app’s plans, categorized into ‘All’, ‘Public’, ‘Custom’, ‘Hidden’ and ‘Archived’ plans. This section also details the unique features linked to each plan, showcasing both the feature types and their specific attributes for easy reference and management.
To add a new plan, simply click Add plan on the Plans page. Mantle offers the flexibility to create dynamic plans with a range of versatile options:
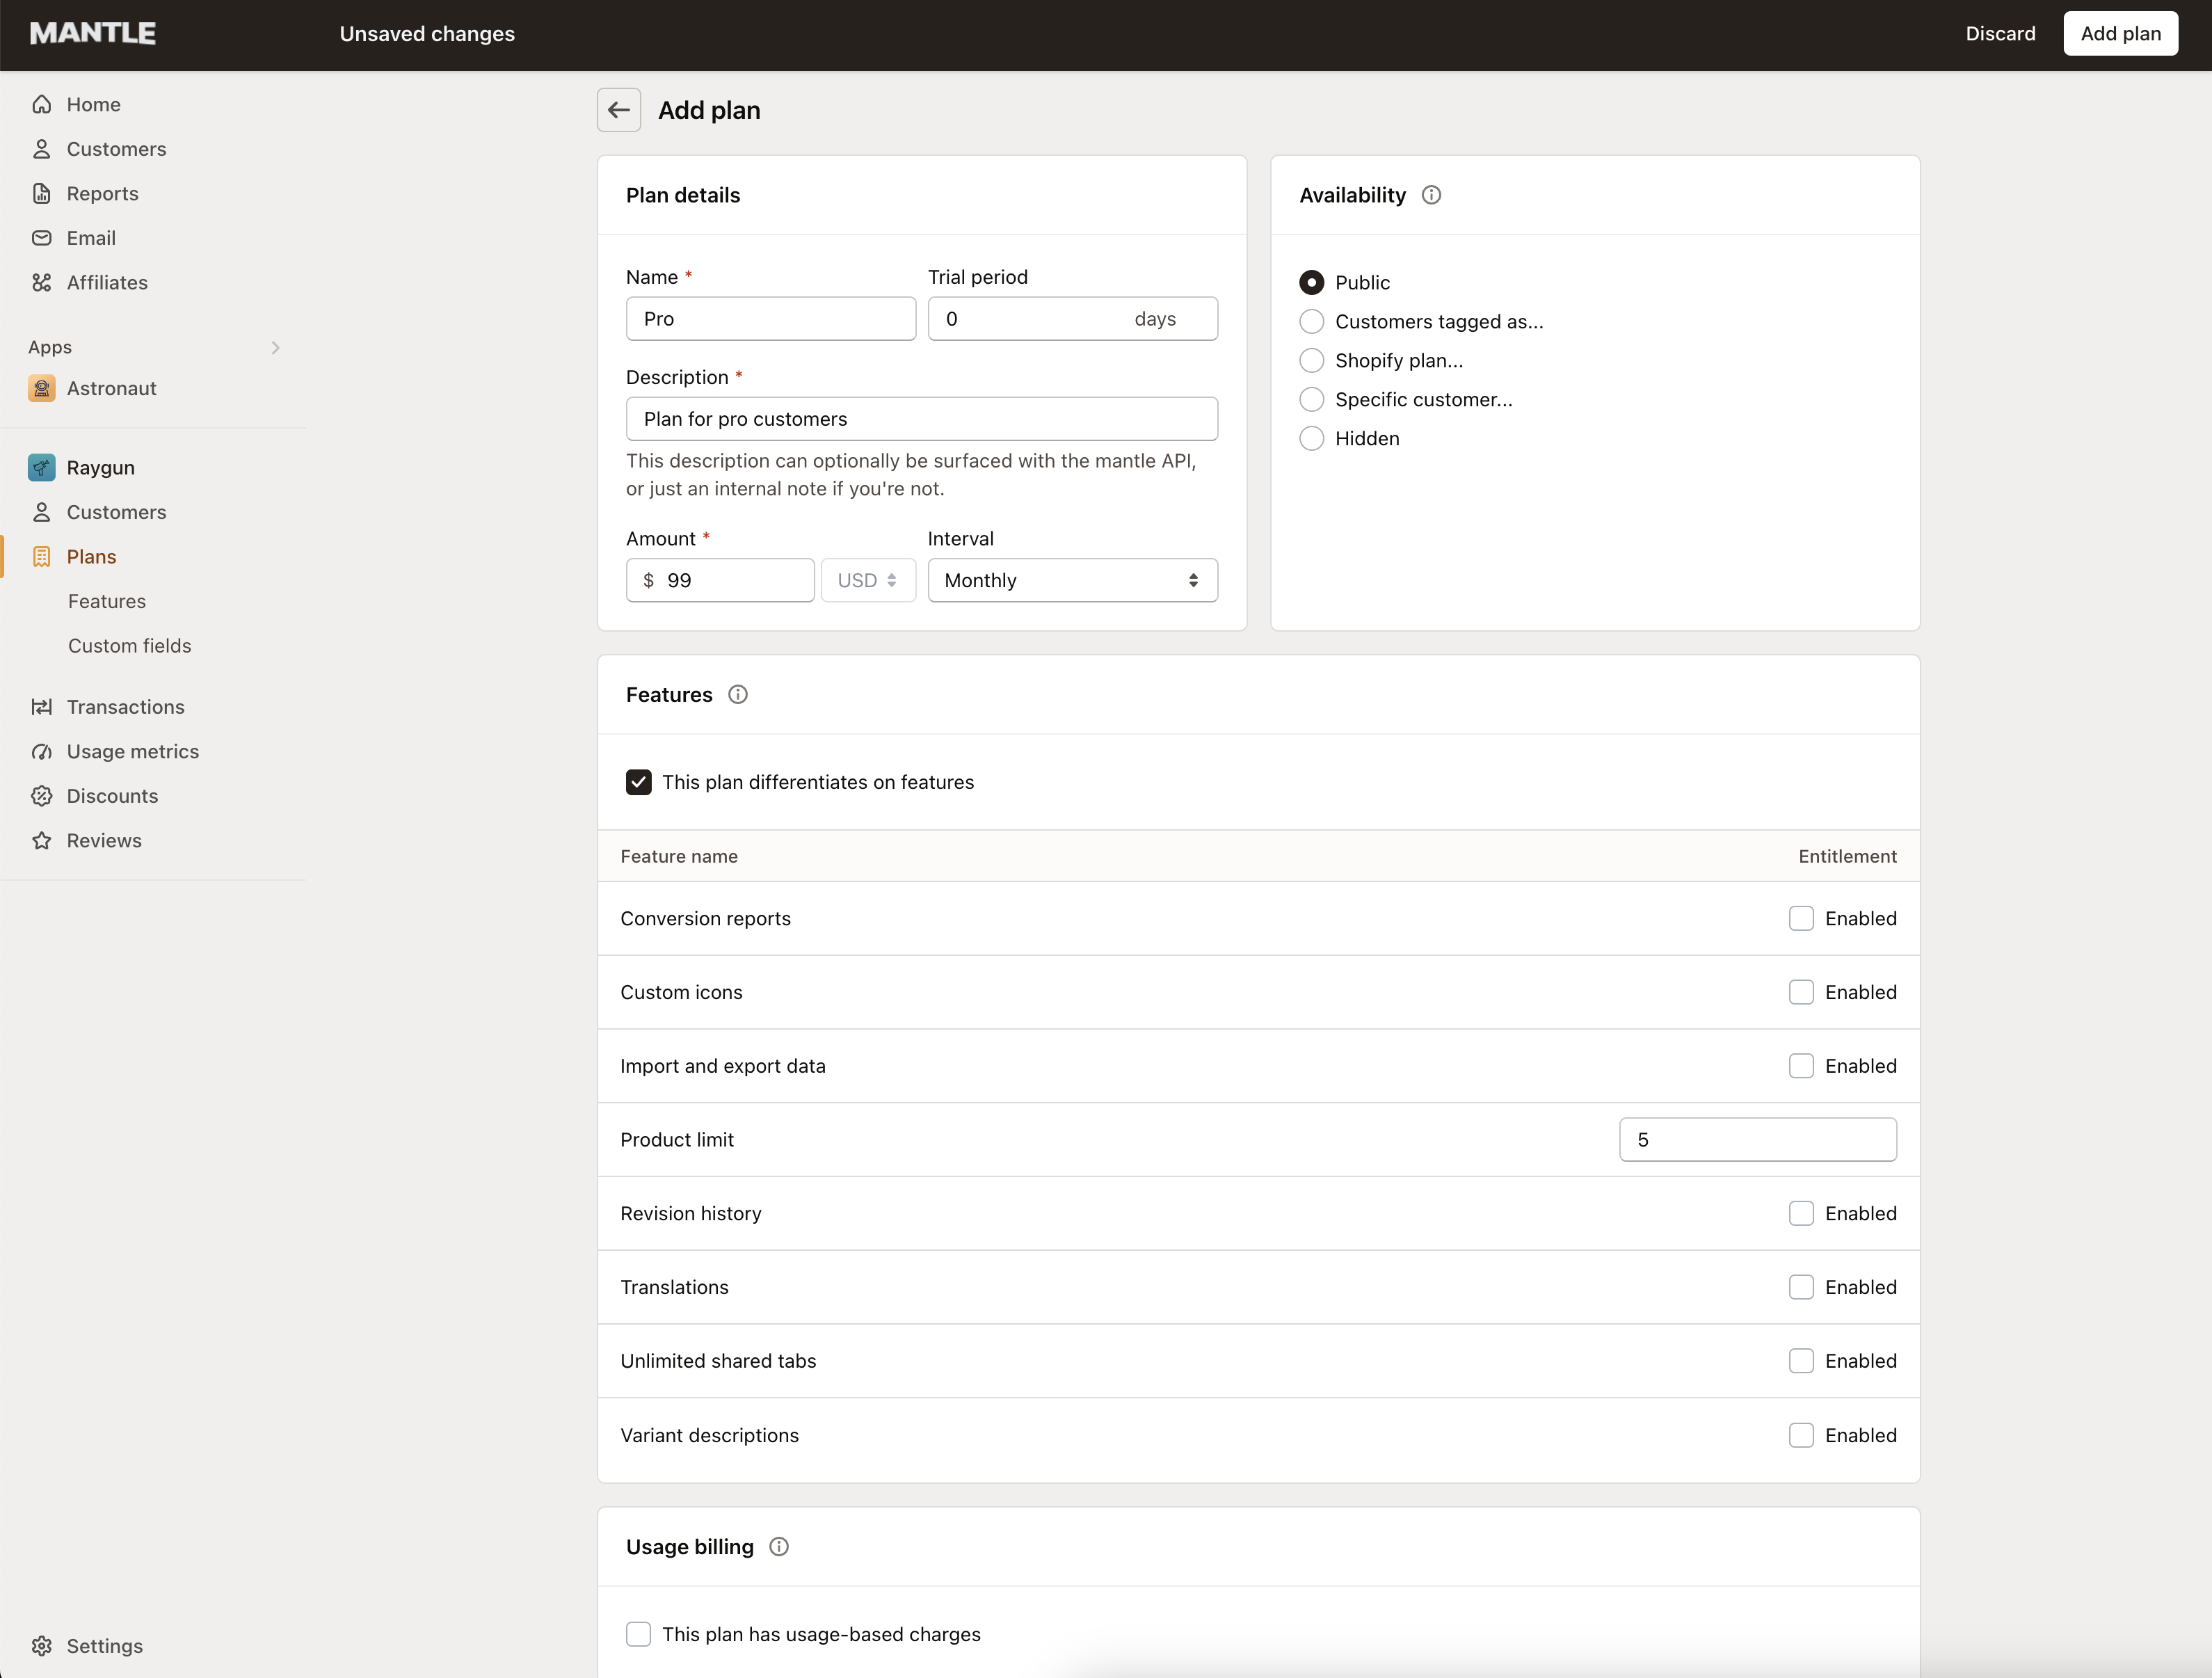
- Plan name: The label of your plan within Mantle, and usually what you’d present to your customer.
- Trial days: The number of trial days you wish to offer within this plan.
- Amount: The pricing of the plan.
- Interval: The recurring billing frequency for the plan.
- Visible to customer(s): Defines if this plan should be returned when querying for plans.
Availability
Mantle’s plan availability enhances your ability to present plans to customers with versatility. Customize who sees which plans based on:
- Public: Accessible immediately to all customers upon app installation.
- By Customer tags: Plans are shown to customers with specific tags for a customized experience.
- By Customer: Tailor exclusive plans for individual customers for personalized engagement.
This empowers you to dynamically adapt plan visibility to suit each customer’s needs. It’s perfect for offering special introductory prices to new customers or loyalty plans to retain existing ones.
Leverage dynamic pricing to transform your customer segmentation into targeted monetization strategies, creating pricing models that truly resonate with each customer group.
Usage billing
Implementing usage billing within Mantle’s plan view is straightforward. Check the box which says This plan has usage based charges and then click on Add usage charge and input the following attributes to create a usage charge:
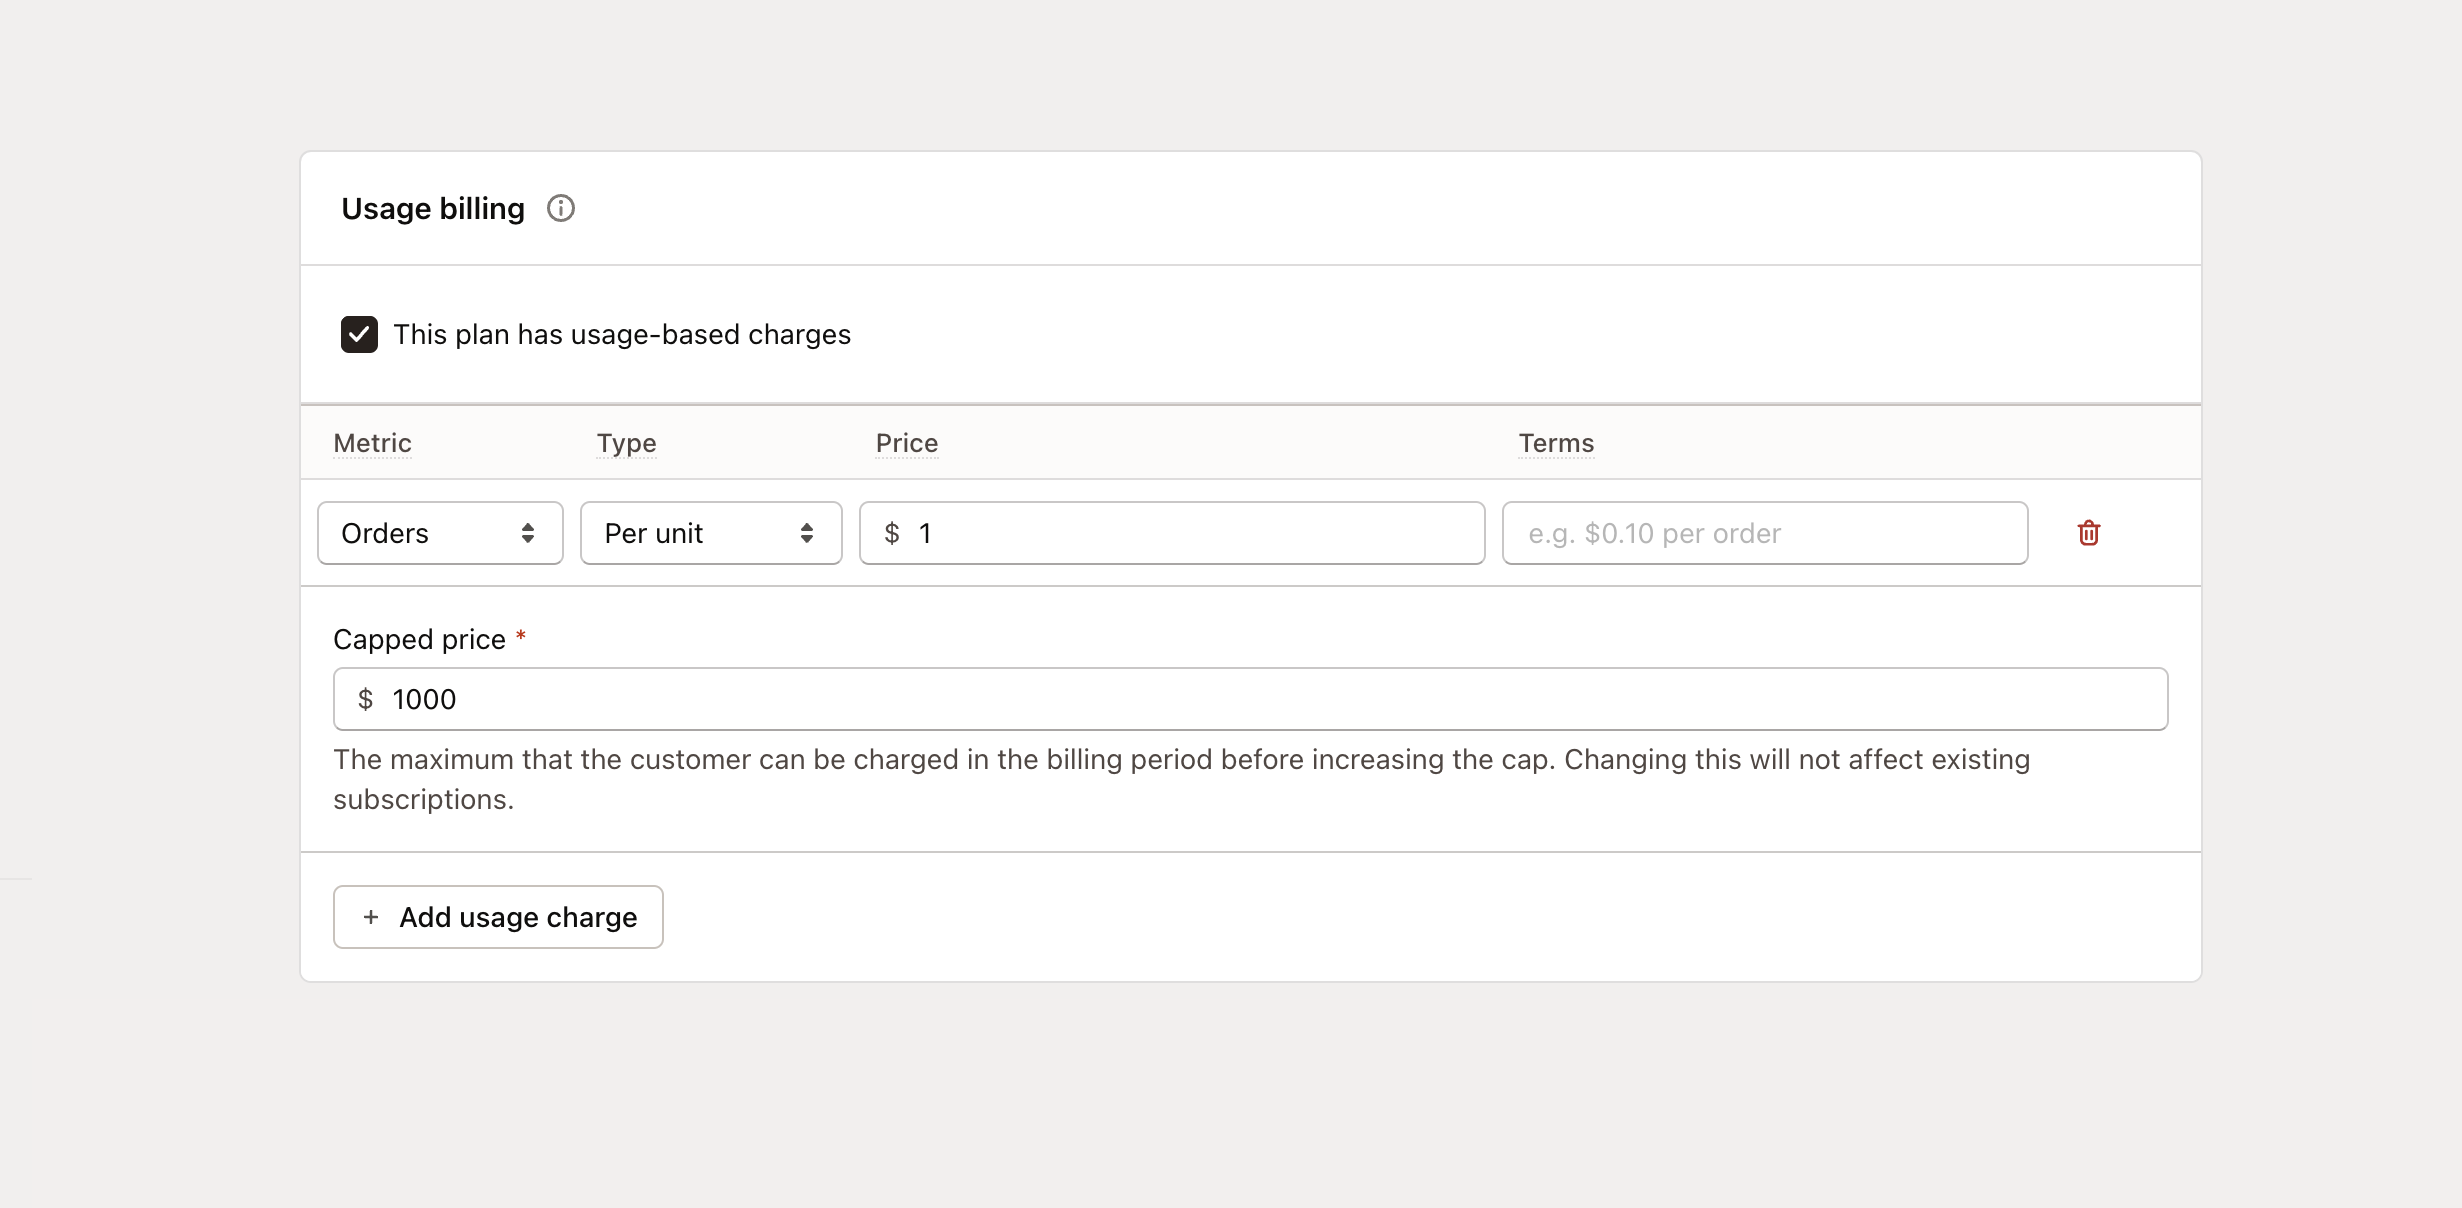
- Name: Designate a name for your usage charge.
- Key: Specify a unique key identifier that your app will use to recognize the usage charge.
- Price: Set the amount you’re charging for this particular usage charge.
- Capped price: Determine the maximum charge that will be permitted for this usage charge.
- Short description: Provide a concise description of the charge that will be visible to your customers.
Once your usage charge is established, you’ll be able to query and employ the data via Mantle’s API. For more information on how to do this, check out Mantle’s usage event API documentation here.
Features
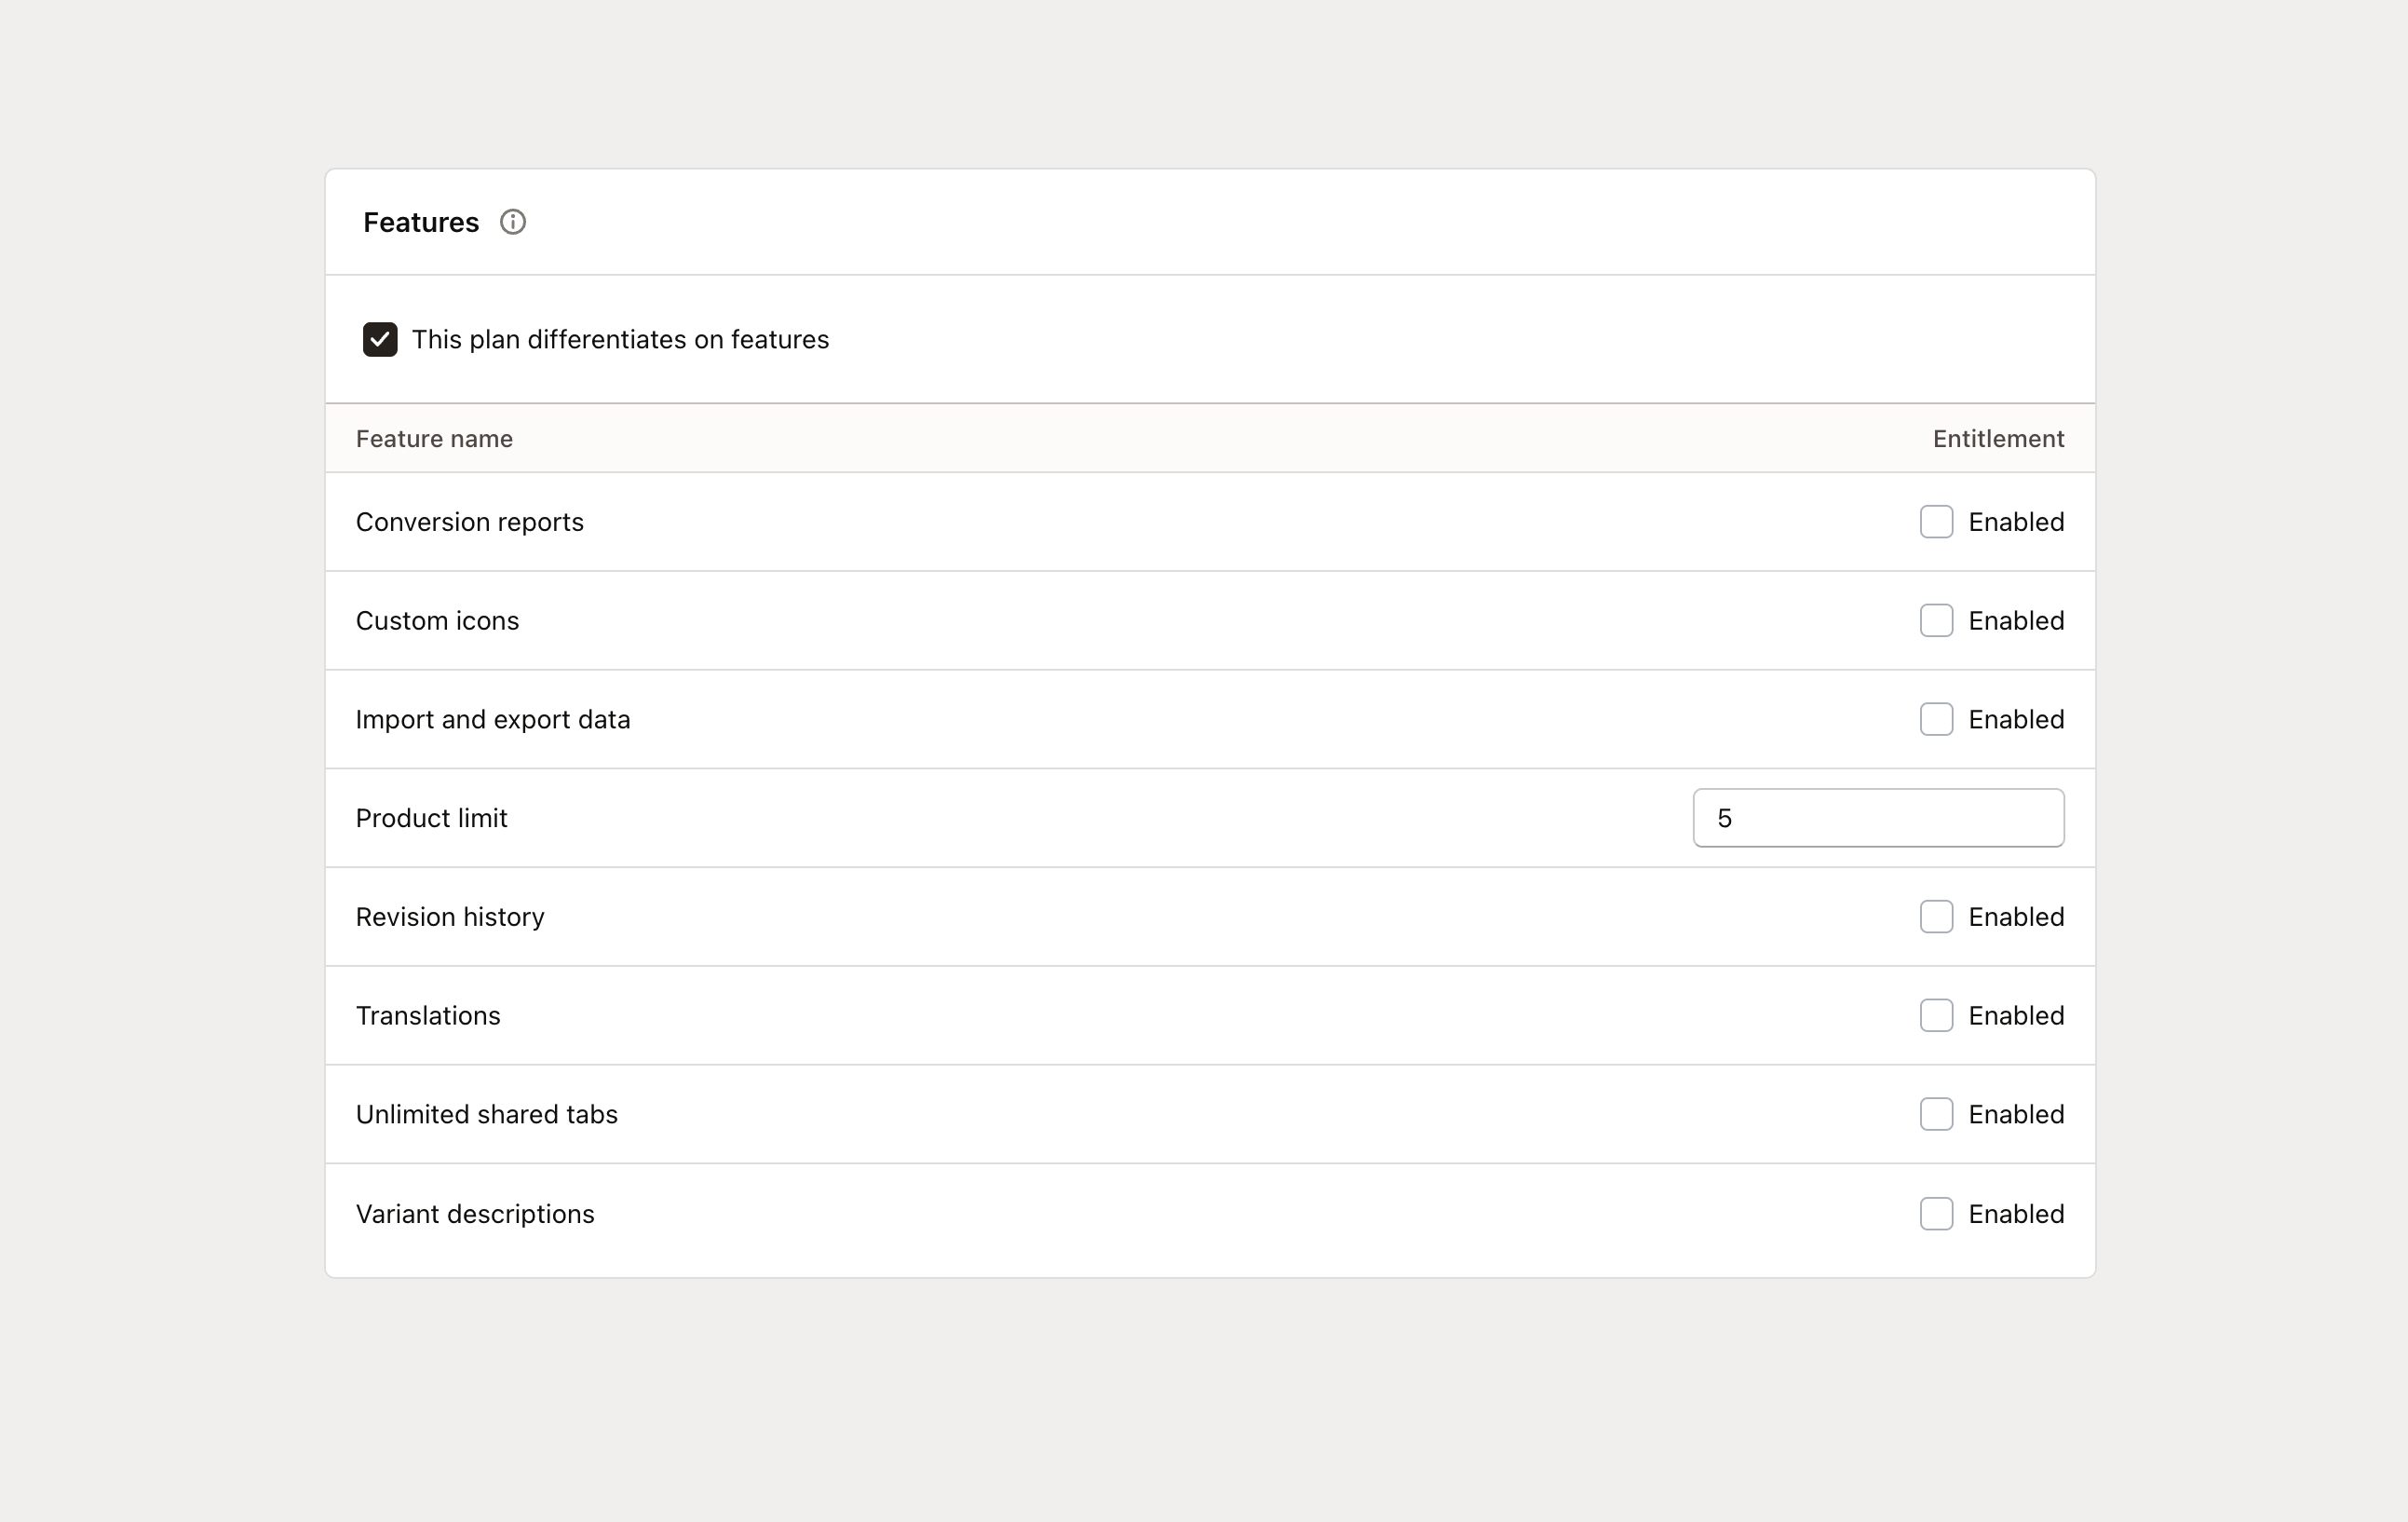
Features let you craft distinct attributes for each plan or customer, distinguishing between plans and aligning features with customer choices. This enhances plan clarity, allowing you to effectively separate and gate features based on subscription levels.
In the Features subnav, located under Plans, you can easily access and manage all your configured features. To introduce new features or modify existing ones, just select a plan and click Edit.
Here’s a breakdown of the options available:
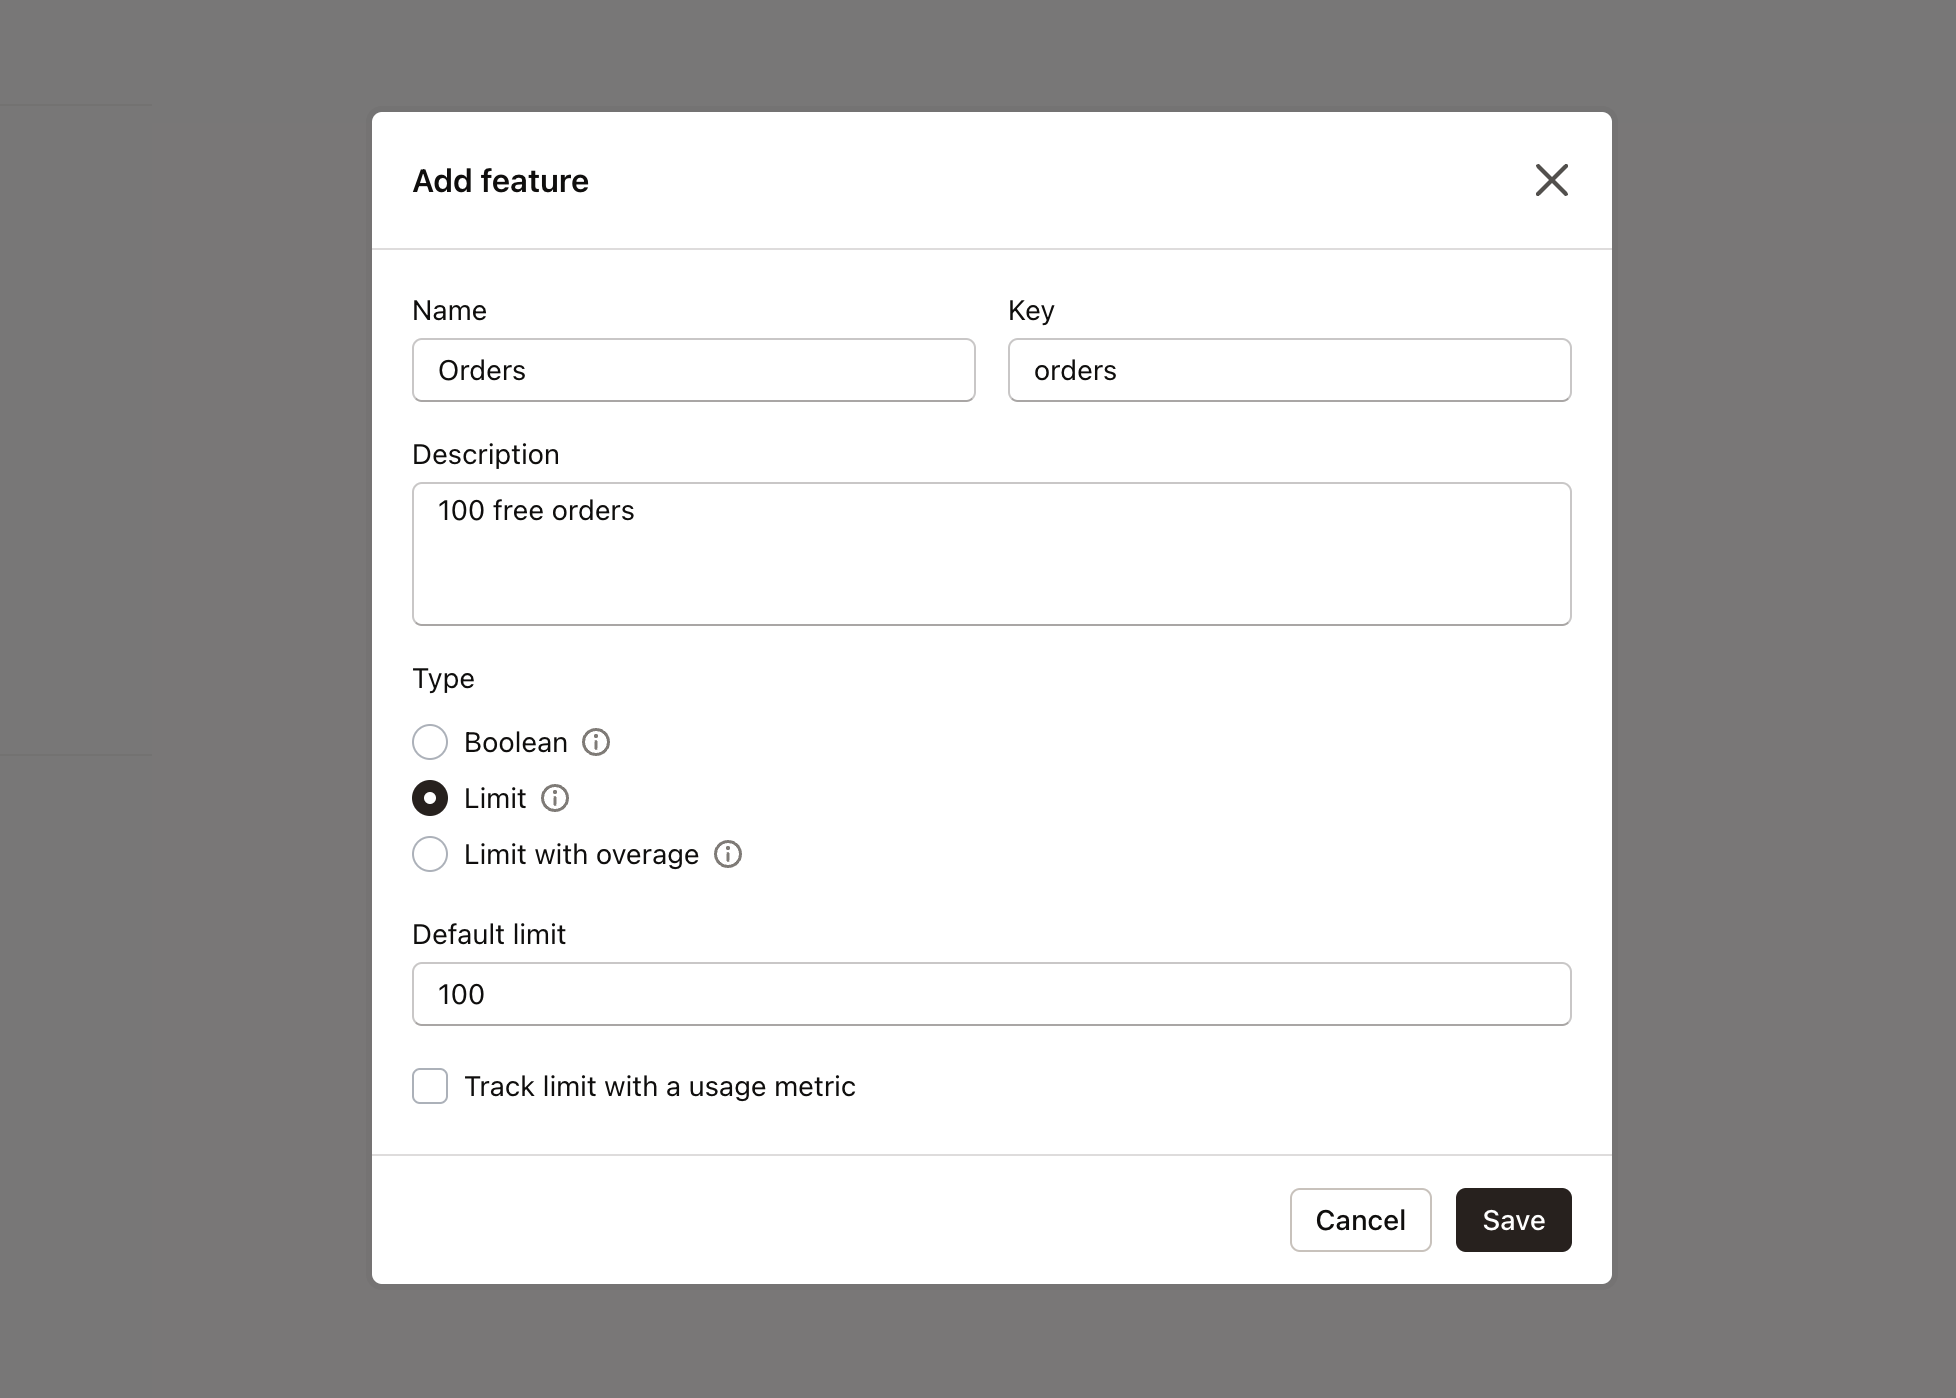
- Feature name: The name that appears in Mantle and to your customers.
- Key: A unique identifier for integration within your app’s code.
- Type: Choose between a limit type or a boolean.
- Limit: Set the maximum number of plans that can include this feature.
- Boolean: A true/false setting indicating if the feature is active.
- Default value: Set a default limit or a boolean value (true/false).
Once your plans are set up in the Mantle admin, discover how to retrieve them using Mantle’s API and implement feature gating for your customers.
Utilizing dynamic pricing and feature management, Mantle opens new avenues for revenue optimization.
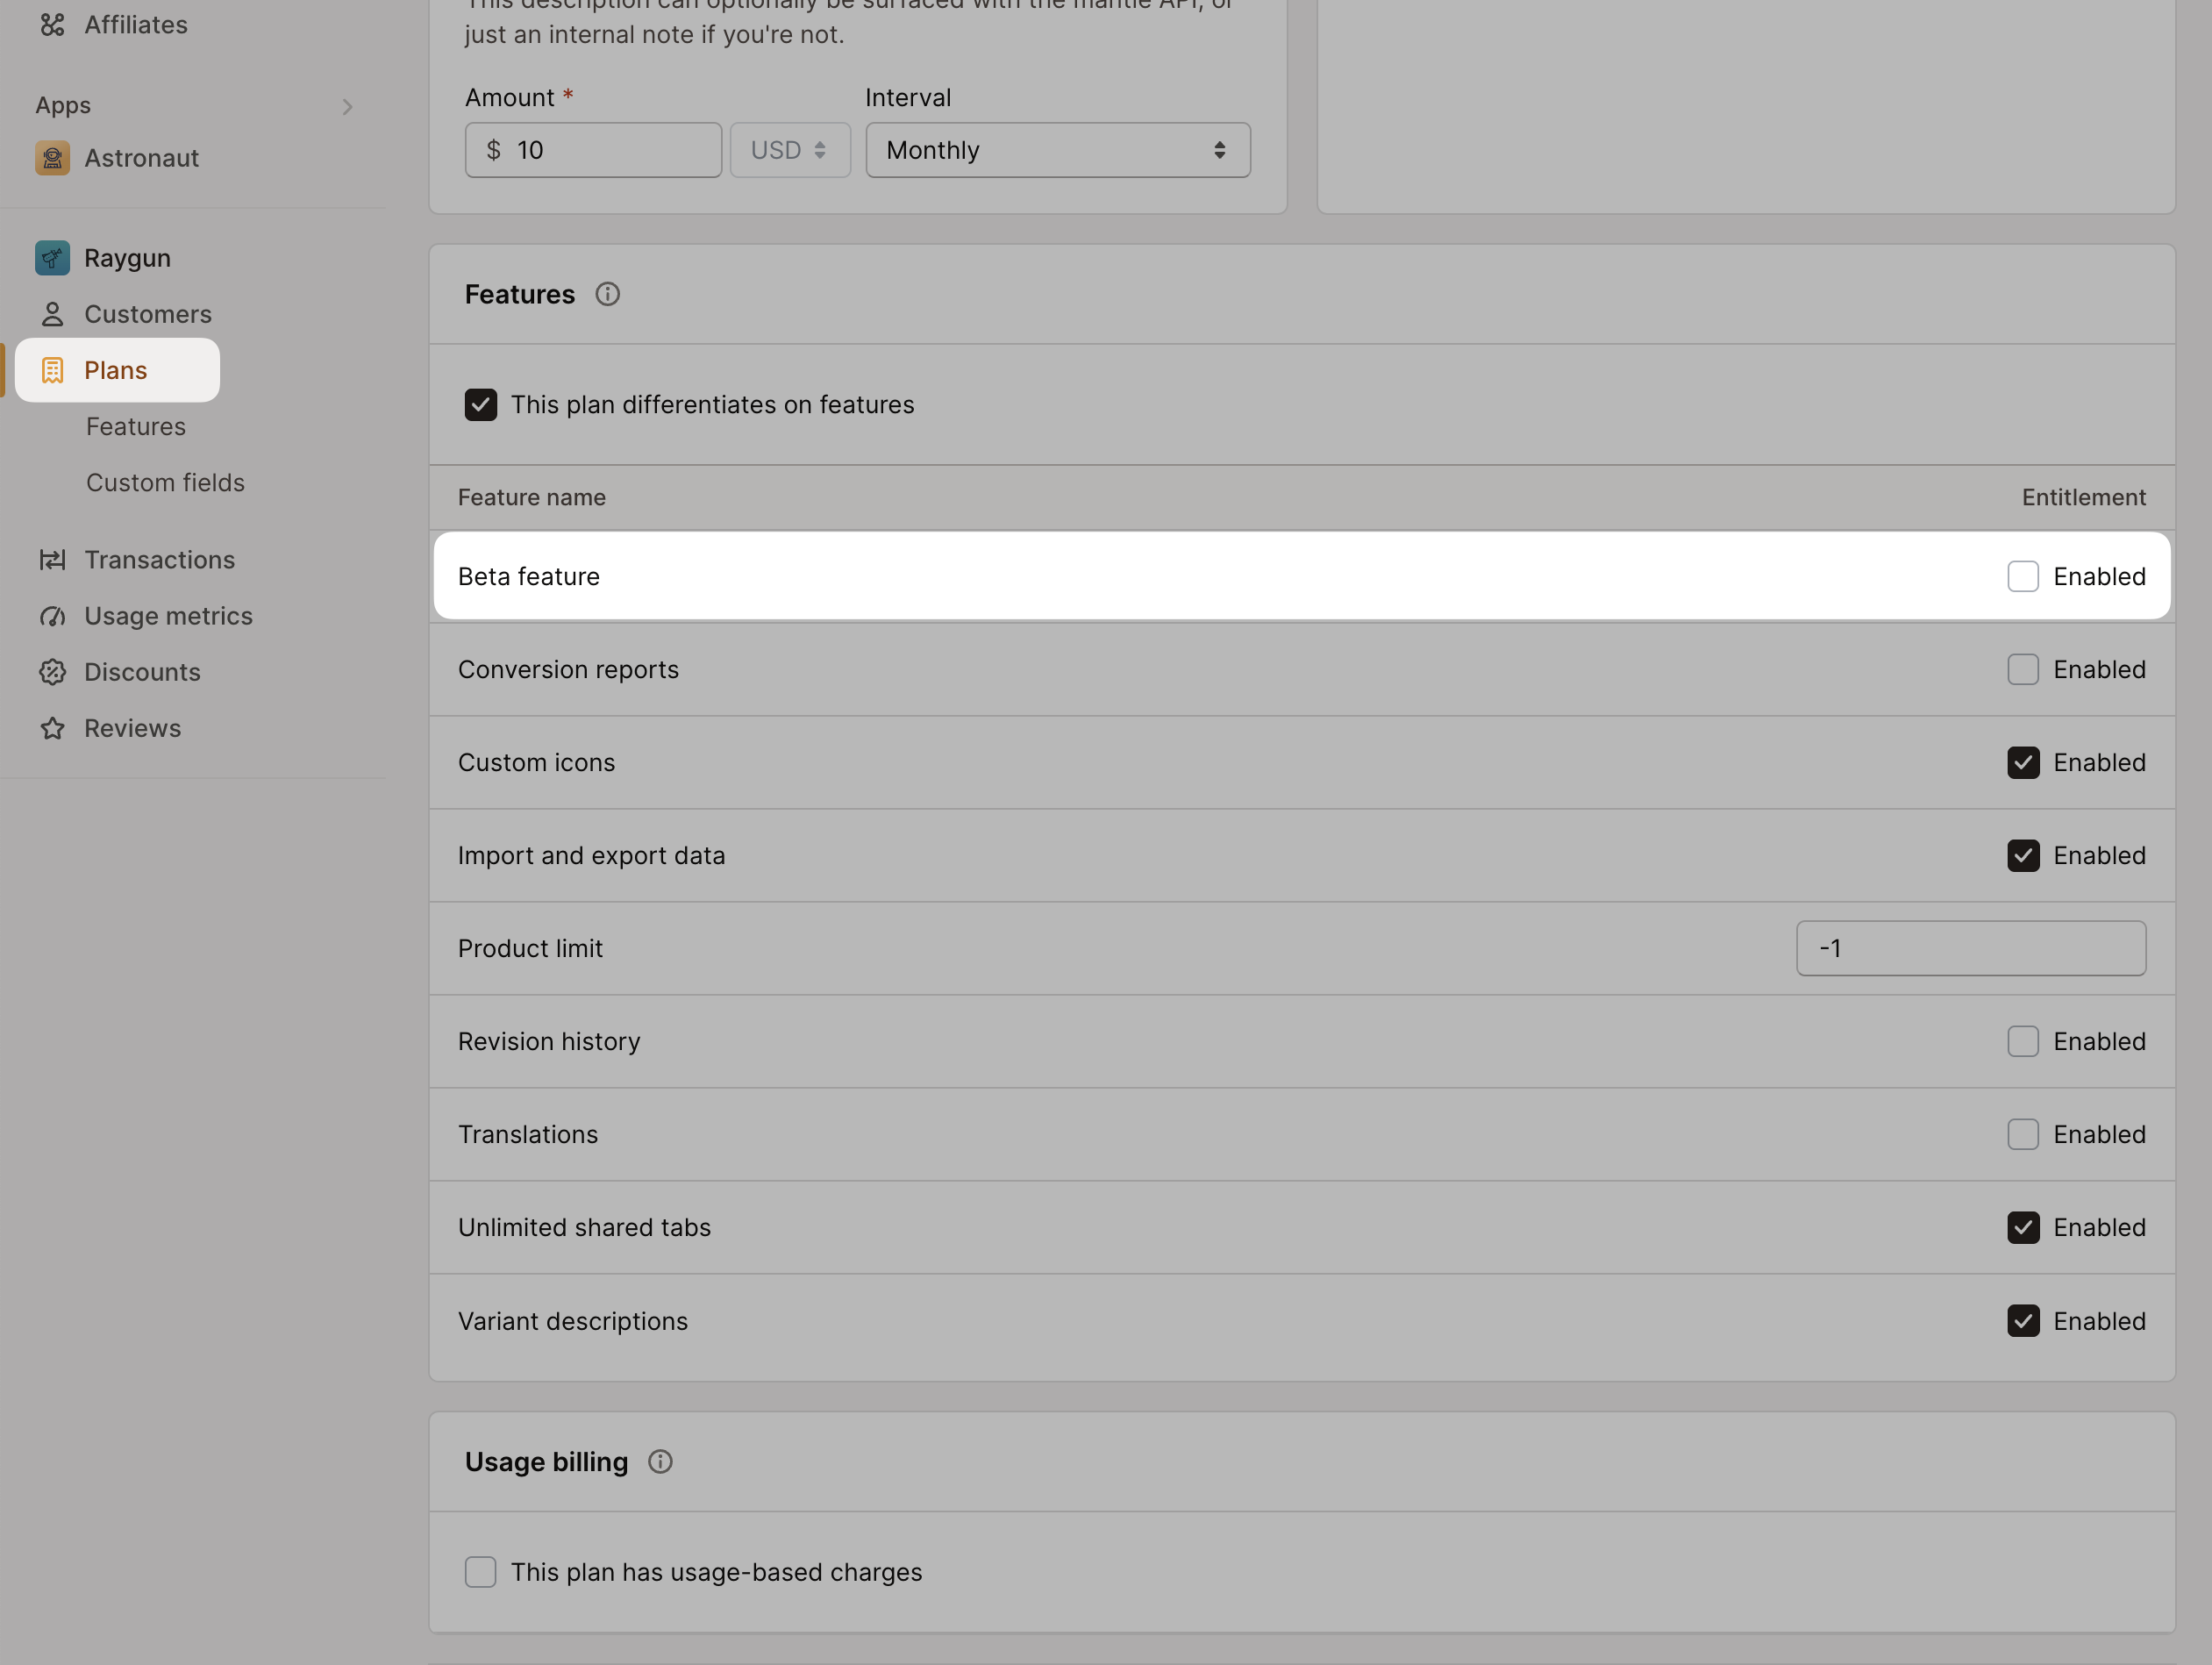
Assigning features to plans and customers
Features reside within the application’s architecture and can be linked to plans or directly to customers as needed.
To associate a feature with a plan after its creation, follow these easy steps:
- Navigate to the Plans section.
- Select the desired plan you wish to edit.
- Click on Edit located in the upper right-hand corner of the screen.
- Within the editing interface, you’ll find the option to activate the feature for the selected plan:
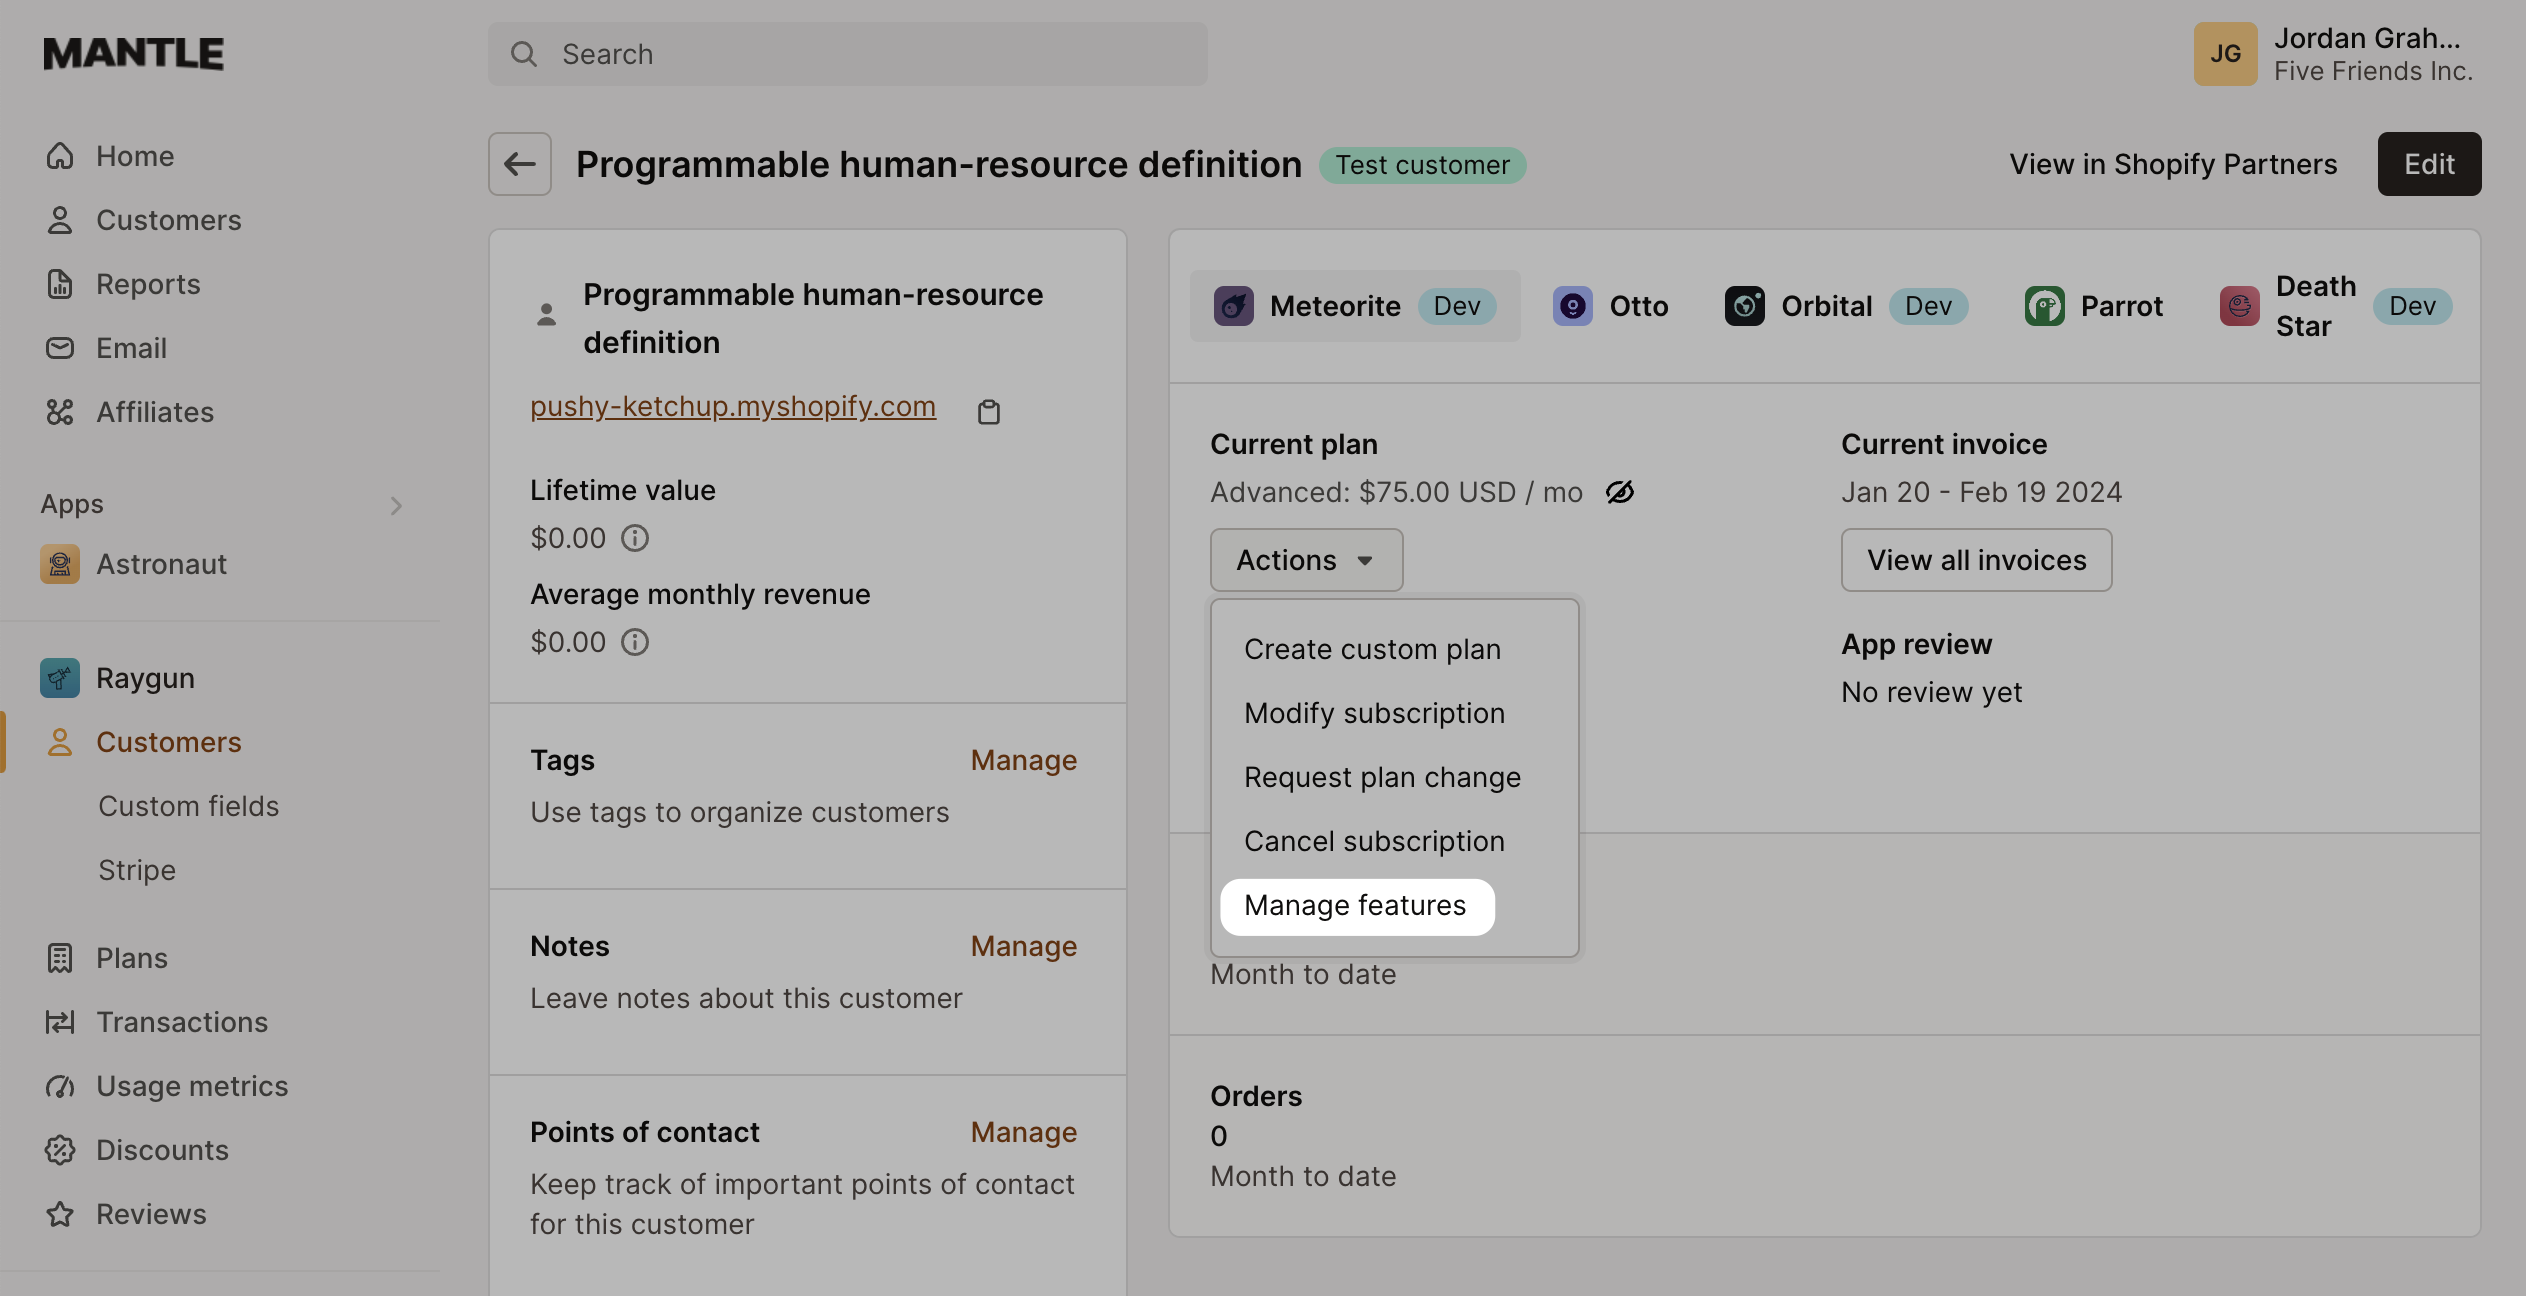
To activate a specific feature for an individual customer, which will override only this feature’s setting associated with their plan (all other plan settings will remain unchanged), please follow these steps:
- Select Customers from the left-hand navigation menu.
- Locate and click on the customer to whom you wish to assign the feature.
- Press the Manage features button.
This will allow you to modify the features associated with that particular customer:
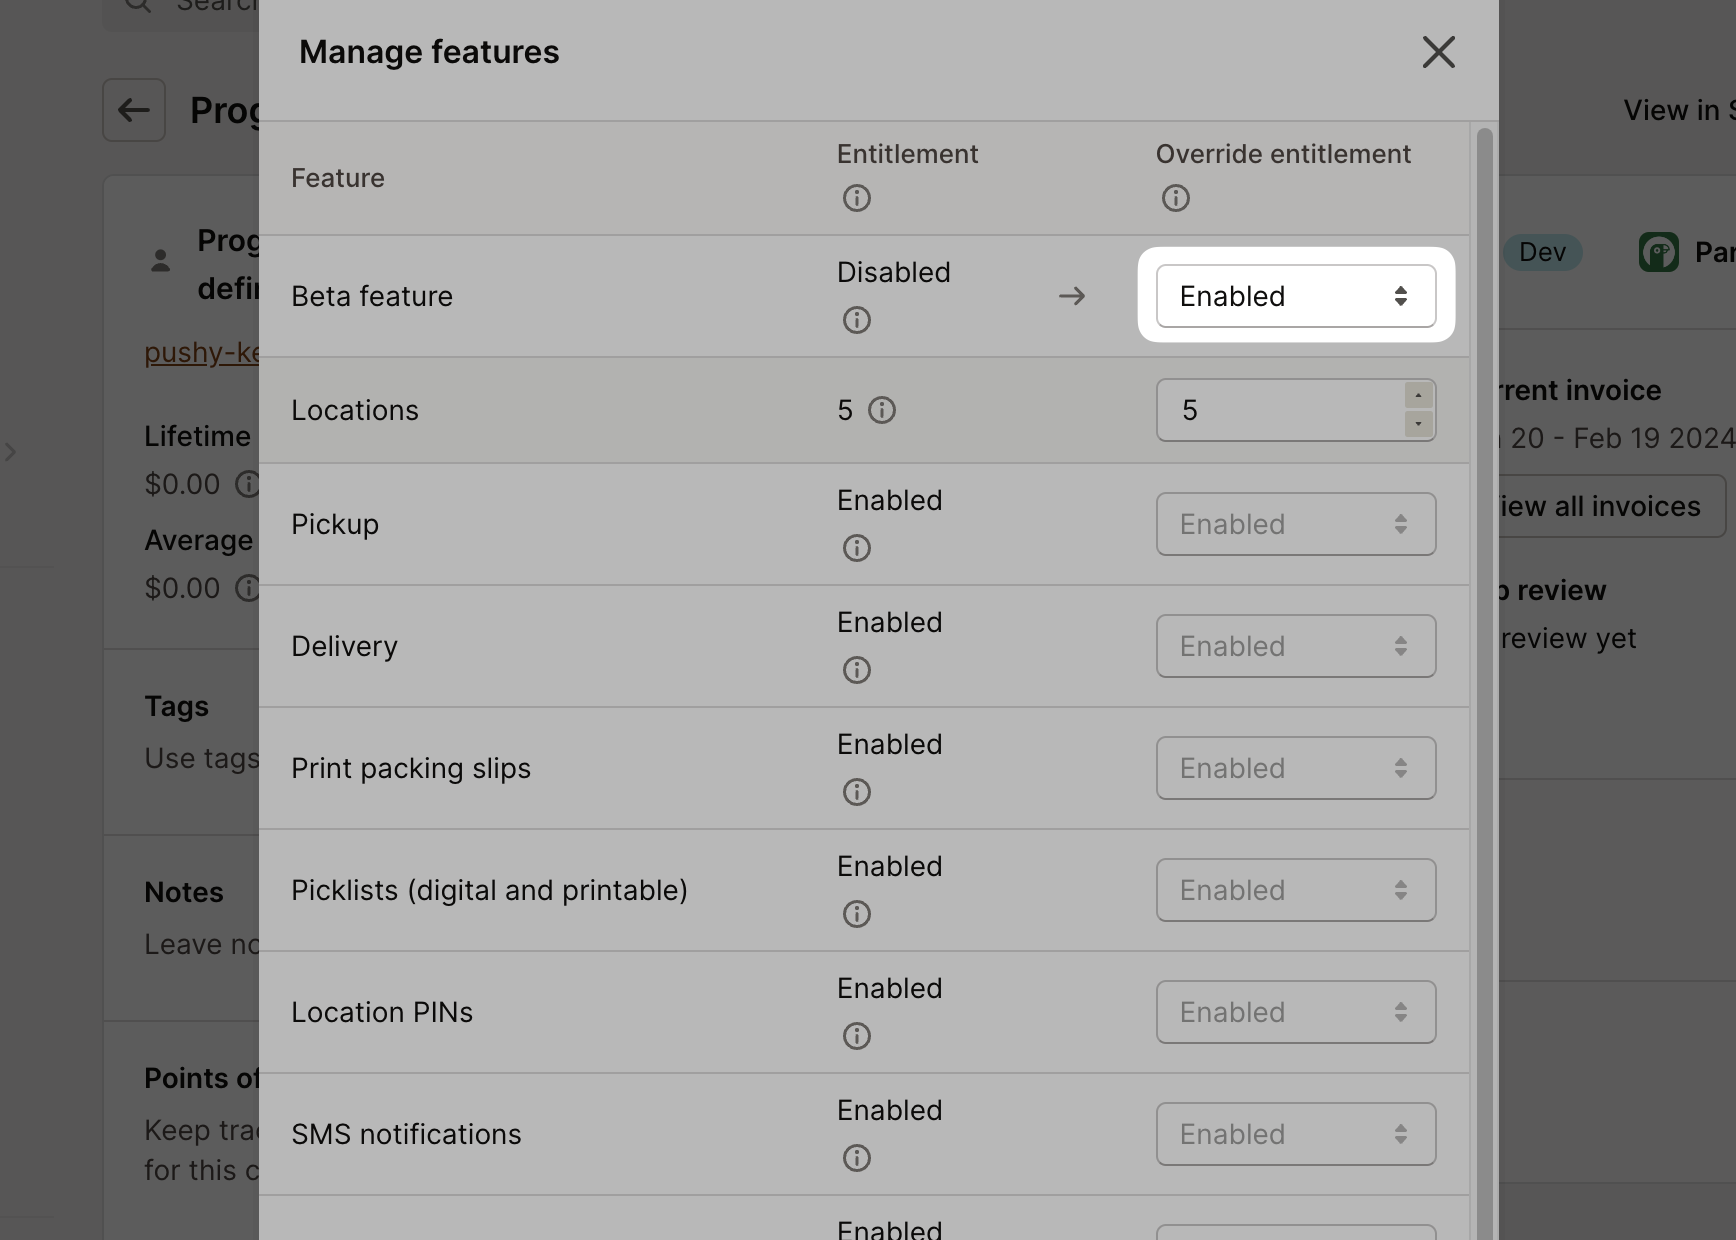
From there, activate the desired features by toggling them on, then click Save to secure your changes.
Next: Transactions