Limiting a feature with usage events
A common use case for usage events is to limit access to a feature after a certain threshold is reached. This guide will walk you through how to set up a plan with a feature that has a limit, and block access to the feature after the limit is reached.
For our example, we’ll create a plan which allows a merchant to send a certain number of messages to their customers. Once the merchant reaches the limit, they will no longer be able to send messages.
Prerequisites
Before you get started, make sure you have already created an app in Mantle, have installed your app on a test store, and have identified the merchant to Mantle using the Mantle API.
For this example, we’ll be using the @heymantle/polaris package to speed up development.
Create a usage metric
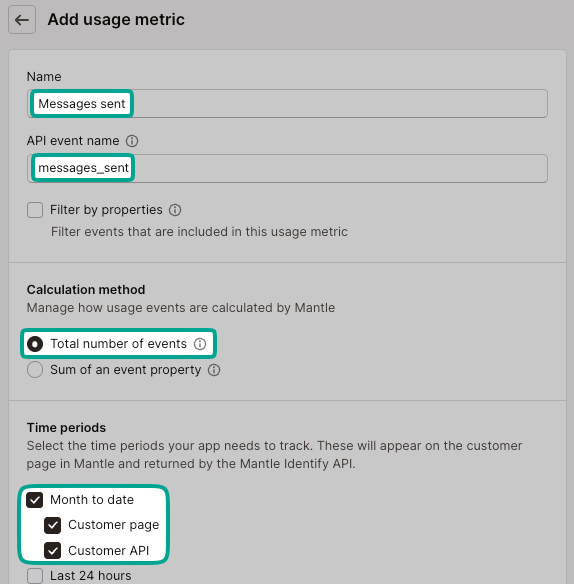
A usage metric is a measure of the usage data that you want to track. In this case, you want to track the number of times a merchant sent a message. For the purpose of this example, we’re just going to increment the usage metric by one unit every time a button is clicked.
To create a usage metric:
- Navigate to your app in the Mantle Admin, and go to the Usage Metrics section.
- Click on the Add usage metric button, and fill in the details for the usage metric.
- Name the usage metric something like Messages sent, which will give you a usage metric key of messages_sent
- Set the aggregation type to Total number of events.
- Finally, since you’re tracking the month’s usage, select Month to date as the time period.
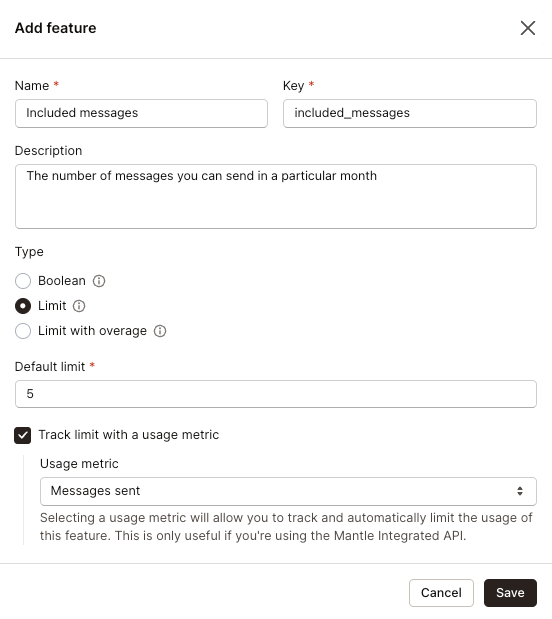
Create a limit feature
Next, you’ll want to create a feature that is defined by a limit. In this case, you’ll create a feature called Included messages with a limit of 5.
To create the feature:
- Navigate to the Plans > Features section in your app’s navigation, and click on the Add feature button.
- Name the feature something like Included messages, and make sure to select Limit as the type of the feature.
- For our example, a default plan will include 5 messages.
- Check the Track limit with a usage metric box, and select the usage metric you created earlier.
Create a new plan with the limit feature
Now that you have a usage metric and a limit feature, you can create a new plan that leverages the limit feature:
- Navigate to the Plans section in your app’s navigation, and click on the Add plan button.
- Fill in the details for the plan, similar to the below screenshot.
- Set the limit to a number you want to limit the feature to. In this case, we’re setting it to 5.
- Click Add plan to save the plan.
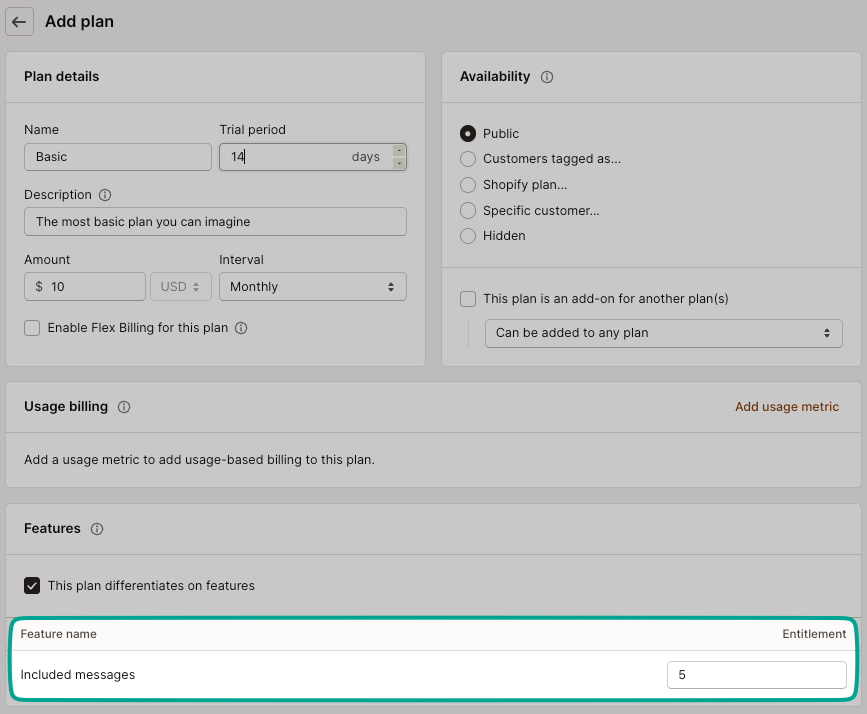
For bonus points, create a second more expensive plan with a higher Included messages limit, such as 10 or 20 messages.
Checking for feature enablements in code
Once you’ve created you’ve created your plans, they should now be visible in your app on your plans page:

To create this view, you can use the PlanCardStack component from the @heymantle/polaris package. This component will display all plans available to the identified merchant, and allow them to select a plan to subscribe to.
import { Page, Layout } from "@shopify/polaris";
import { useNavigate } from "react-router-dom";
import { useMantle } from '@heymantle/react';
import { PlanCardStack, PlanCardType } from '@heymantle/polaris';

export default function () {
  const navigate = useNavigate();

  const { customer, plans, subscribe } = useMantle();

  return (
    <Page
      title="Plans"
      backAction={{
        content: "Shop Information",
        onAction: () => navigate("/"),
      }}
    >
      <Layout>
        <Layout.Section>
          <PlanCardStack
            cardType={PlanCardType.Highlighted}
            customer={customer}
            plans={plans}
            onSelectPlan={async ({ plan, discount }) => {
              const subscription = await subscribe({ planId: plan.id, discountId: discount?.id, returnUrl: '/plans' });
              open(subscription.confirmationUrl, "_top");
            }}
          />
        </Layout.Section>
      </Layout>
    </Page>
  );
}
Let’s break down the code above:
- The
useMantlehook is used to access details about the current customer, available plans, and thesubscribefunction. - The
PlanCardStackcomponent is used to display all available plans to the identified merchant. - The
onSelectPlancallback is triggered when a merchant selects a plan. This callback will return aconfirmationUrlwhich is used to redirect the merchant to the charge confirmation page in Shopify.
Once the merchant has confirmed the charge at the confirmation URL, they will be redirected back to your app, at the provided returnUrl.
Determining your customer’s available usage
To determine how many messages a merchant has sent, you will get details about the customer, their subscription and their subscribed plan using the customer object surfaced with the useMantle hook.
Add the following code to your app to see details about your customer:
import { useMantle } from '@heymantle/react';

// Used inside your functional component
const { customer } = useMantle();

// Log the customer object to the console
console.log('Customer: ', customer);
Which will give you a response similar to this:
{
id: "customer-id",
features: {
"included_messages": {
name: "Included messages",
type: "limit",
value: 5,
usage: {
currentValue: 0,
eventName: "messages_sent",
monthToDateValue: 0,
}
}
}
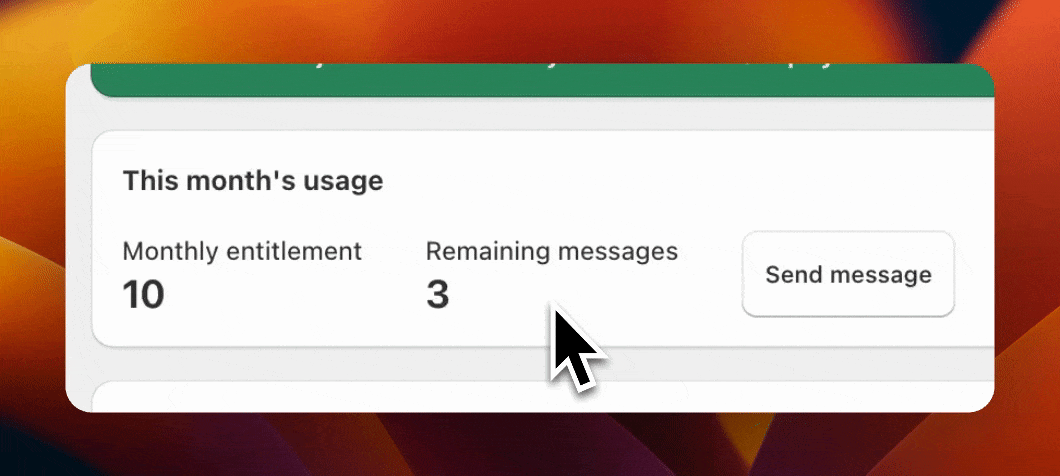
}As you can see from the above, the customer object contains details about the customer, including the features they have access to. In this case, the customer has access to the Included messages feature, which has a limit of 5 messages. The usage object contains details about the current usage of the feature, including the current value and the month-to-date value. Let’s throw these details in a Polaris <Card> component:
const { customer, sendUsageEvent, refetch } = useMantle();

const [sending, setSending] = useState(false);
const includedMessagesFeature = customer?.features["included_messages"]
const remainingUsage = includedMessagesFeature ? includedMessagesFeature.value - (includedMessagesFeature.usage?.currentValue || 0) : 0;

const handleSendMessage = async () => {
  setSending(true);

  // typically you would send this in a service api call
  await sendUsageEvent({
    eventName: 'messages_sent',
  })

  // wait 2 seconds to simulate server event
  await new Promise(resolve => setTimeout(resolve, 2000));

  // refetch customer
  await refetch();

  setSending(false);
}

return (
  <Card>
    <BlockStack gap="400">
      <Text variant="headingMd" as="h6">
        This month's usage
      </Text>
      {includedMessagesFeature && includedMessagesFeature.value == 0 && (
        <Banner>
          You need to subscribe to a plan with a usage entitlement to use this feature.
        </Banner>
      )}
      <InlineStack gap="800">
        <BlockStack>
          <Text>Monthly entitlement</Text>
          <Text variant="headingLg">
            {includedMessagesFeature?.value || ''}
          </Text>
        </BlockStack>
        <BlockStack>
          <Text>Remaining messages</Text>
          {includedMessagesFeature && (
            <Text variant="headingLg">
              {remainingUsage}
            </Text>
          )}
        </BlockStack>
        <Button onClick={handleSendMessage} loading={sending} disabled={remainingUsage <= 0}>Send message</Button>
      </InlineStack>
    </BlockStack>
  </Card>
);
Using the above example, you can now display the current usage of the Included messages feature to the merchant, and allow them to send messages up to the limit. Once the limit is reached, the Send message button will be disabled.
Please note: the above example is a simplified version of how you might implement this feature in your app. You should consider adding error handling and other features to make the user experience as smooth as possible. In addition, you should also typically check your customer’s usage before allowing them to send a message via your own backend implementation, to ensure they have not exceeded their limit.